
Adding a secondary audio output device to your project can appear to be a daunting task. Here we’ll walk through the steps, using C++ and WWise API for Unreal Engine 5.
Setup your Wwise project
To send audio to two different audio devices you we’ll need to setup up your Wwise project with the following:
- Add a new Audio Device to your Audio Devices Shareset
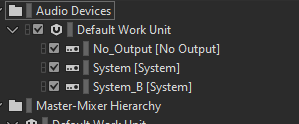
Right click on the Default Work Unit and create a new child. We’re working on Windows, so we add a new System output. System_B is our newly created Wwise Audio Device.
2. Add a secondary Master Bus, to output to your new audio device
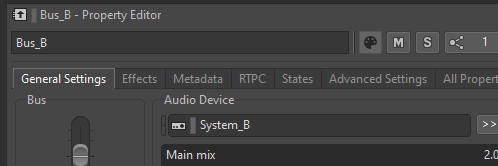
In the Audio Device field, select the new audio device.
3. In your Actor Mixer Hierarchy, set the output bus as the secondary master bus

If you want a sound to go to both outputs, you can add an auxilliary bus to the other one. However, make sure this sound is listened to by listeners that are assigned to each output device (we’ll cover this later on).
Setup your UE5 Project to use the Wwise C++ API
- Make sure you have C++ added to you Unreal Engine project.
- In your project Hierarchy, open Source\$ProjectName\$ProjectName.Build.cs
- Add the following to PublicDependencyModuleNames: “AkAudio”, “WwiseSoundEngine”
- Recompile your project
PublicDependencyModuleNames.AddRange(new string[] { "Core", "CoreUObject", "Engine", "InputCore", "EnhancedInput", "AkAudio", "WwiseSoundEngine" });Adding a second audio device in UE5
Depending on your use case, you may want to set this up in various ways. Think about your use case and what you need the second audio device to represent. This tutorial will create a new Listener object that outputs to a different audio device, e.g. a VR Headset.
- Create a new Actor class in your UE5 project, name it accordingly. We are calling ours ‘Listener’.
- In your .h file add #include “WwiseUnrealObjectHelper.h”
- In your .h file. Declare the following properties and functions in the protected section:
//The Listener we associate with the new output device
UPROPERTY(VisibleAnywhere, BlueprintReadonly, Category = "Wwise")
class UAkComponent* AkComponent;

//Function to create the output at runtime
UFUNCTION(BlueprintCallable, Category = "Wwise")
void AddWwiseOutput();

//Function to remove the output when we stop (for UE5 editor)
UFUNCTION(BlueprintCallable, Category = "Wwise")
void RemoveWwiseOutput();

//The ID of the Wwise Audio Device we created
FAkOutputDeviceID WwiseDeviceID;
Setup your .cpp file
- Add the following includes for the Wwise API:
- #include “AkComponent.h”
- #include “AkGameplayStatics.h”
Create the AkComponent listener in the class constructor
AListener::AListener()
{
PrimaryActorTick.bCanEverTick = true;

AkComponent = CreateDefaultSubobject<UAkComponent>(TEXT("AkComponent"));
//If you want to attach to something else, swap out RootComponent for that.
AkComponent->SetupAttachment(RootComponent);
//We don't want any occlusion on our listener component
AkComponent->OcclusionRefreshInterval = 0.0f;

}
When we add our new output in Wwise, we will want to associate this listener with it. That way, sounds heard by this listener will output to our new device.
Define the AddWwiseOutput() function
This is the main part of the tutorial. I will work through it in chunks, explaining as we go.
The first step of adding an audio device is finding the one that we actually want to use. We can do this by iterating through all of the active ones, until we find the one we’re looking for.
First, declare an Integer variable to store the number of audio devices on our system. Call AK::GetWindowsDeviceCount() , which will return the total number of audio devices.
AkUInt32 IMMDeviceCount = AK::GetWindowsDeviceCount();Later, we are going to iterate through all of these devices until we find the one we want. So let’s create two variables to store the Device ID of the Audio Devices we’re looking at.
//ID of the device we are currently iterating through
AkUInt32 FoundDeviceID = AK_INVALID_DEVICE_ID;
//To store the ID of the correct device, when we arrive at it.
AkUInt32 TargetDeviceID = AK_INVALID_DEVICE_ID;
Next we will create a variable containing the name of the audio device we want to find. You should write it as it appears in the Windows device manager. For example, if you wanted to output to your Oculus Quest headset, you would put “Headphones (Oculus Virtual Audio Device)”, because that is the audio device used by Quest headsets.
const wchar_t* TargetDeviceName = L"Headphones (Oculus Virtual Audio Device)";const wchar_t* is a slightly unusual looking variable, but don’t worry too much about it. It’s just so we can compare it against the value that is returned by AK::GetWindowsDeviceName() (this is coming up!).
We also want to declare a pointer to an IMMDevice. We don’t actually do anything with this, but AK::GetWindowsDevice() asks for one, so we’ll do it anyway!
IMMDevice* pDevice;Finally, we need to create an array of AkComponents that we want to associate with the new output device. You might want this to just be the listener we constructed earlier, or maybe you want the Default Listener to output to this device also. It depends on your use case. You can get access to your Default Wwise Listeners using AkAudioDevice::GetDefaultListeners(). In our case, we’re just going to associate the listener we created in the constructor, so that looks like this:
TArray<UAkComponent*> AkComponents;
AkComponents.Add(AkComponent);
Now it’s time to iterate through all the devices we in IMMDeviceCount and find the one that matches our TargetDeviceName. We’ll use a for loop to iterate through and each time we loop through, we’ll do the following:
- Get the Windows audio device at the index of i, and store the ID of that device in FoundDeviceID.
- Retrieve the name of the device with FoundDeviceID
- Compare FoundDeviceName with TargetDeviceName. If they don’t match, move onto the next device in IMMDeviceCount. If they do match, assign the value of FoundDeviceID to TargetDeviceID (because we’ve found the right one), and break out of the loop.
The steps above look like this:
for(AkUInt32 i = 0; i < IMMDeviceCount; i++)
{
AK::GetWindowsDevice(i, FoundDeviceID, &pDevice, AkDeviceState_Active);

const wchar_t* FoundDeviceName = AK::GetWindowsDeviceName(i, FoundDeviceID, AkDeviceState_Active);

if(FString(TargetDeviceName) == FString(FoundDeviceName))
	{
	TargetDeviceID = FoundDeviceID;
	break;
	}

}
Now that we have found the ID of the audio device that we want to add to Wwise, we can go about creating that device in the Wwise Sound Engine.
Define the settings for our new Wwise Output Device
Before we tell the Wwise Sound engine to create the output device, we need to define some settings for that output device to use. That way, Wwise knows what rules to follow when outputting audio to the endpoint on our system. Output settings are defined in a Struct called AkOutputSettings. Below is the definition for the AkOutputSettings type, it takes four parameters:
- AudioDeviceSharesetName. This is the name we gave our new audio device in Wwise, in our case it is “System_B”.
- IdDevice. This is the ID of the Audio Device that we want to attach to, e.g. the one we found when iterating through devices on our system. In our case, it is TargetDeviceID.
- PanRule. The panning rule for the device to adopt, we need to pass in a Wwise struct calling PanningRule. Commong options are PanningRule_Speakers, or PanningRule_Headphones.
- ChannelConfig. Similar to the above, what channel config should the device use. If we set to Ak_Parent, Wwise will use the channel configuration of the device we are connecting to.
USTRUCT(BlueprintType)
struct FAkOutputSettings
{
	GENERATED_BODY()
public:
	UPROPERTY(EditAnywhere, Category = "Output Settings", BlueprintReadWrite)
	FString AudioDeviceShareSetName;

	UPROPERTY(EditAnywhere, Category = "Output Settings", BlueprintReadWrite)
	int32 IdDevice = 0;

	UPROPERTY(EditAnywhere, Category = "Output Settings", BlueprintReadWrite, meta=(DisplayName="PanningRule"))
	PanningRule PanRule = PanningRule::PanningRule_Speakers;

	UPROPERTY(EditAnywhere, Category = "Output Settings", BlueprintReadWrite)
	AkChannelConfiguration ChannelConfig = AkChannelConfiguration::Ak_Parent;
};
Here’s how we’ve defined the Wwise Output settings in our .cpp file, using the values discussed above:
const FAkOutputSettings NewOutputSettings =
	{"System_B",
	TargetDeviceID,
	PanningRule::PanningRule_Speakers,
	AkChannelConfiguration::Ak_Parent
	};
Add the new Wwise Output device
Finally, the grand payoff. We can call UAkGameplayStatics::AddOutput(), passing in the parameters we defined earlier. The function takes three parameters, I will outline them below.
static void UAkGameplayStatics::AddOutput(const FAkOutputSettings &in_Settings, FAkOutputDeviceID &out_DeviceID, TArray<UAkComponent *> &in_ListenerIDs)- in_Settings. This is the AkOutputSettings we created above, we will pass in NewOutpuSettings.
- out_DeviceID. NOTE: This can cause some confusion (well it did with me anyway!). This is not the ID of the Audio Endpoint on our System (we gave that to our NewOutputSettings struct). This is a Wwise variable used to store the ID of the Wwise Output device we are creating. It’s important to store this so that when we remove the device, the Wwise SoundEngine has someting to identify the device we are destroying. At the start of this tutorial, we created a AkOutputDeviceID type in our .h file called WwiseDeviceID. This is what we shall be passing into the function.
- in_ListenerIDs. This variables is slightly misnamed because we are not passing in IDs we are passing in an array of AkComponent pointers. We created this array earlier in our function definition, we can pass in AkComponents.
Don’t forget to remove your new output device!
Before we test this, we need to define our other function RemoveOutput(), otherwise when we play the game for a second time Wwise will encounter an error becuse we are trying to attach an output device that is already associated with Wwise. We can remove the output using UAkGameplayStatics::RemoveOutput(). Passing in WwiseDeviceID.
void AListener::RemoveWwiseOutput()
{
	UAkGameplayStatics::RemoveOutput(WwiseDeviceID);

}
Finish up your class and test
Now you need to implement your functions into gameplay so that they are called at the right time. Putting them in BeginPlay() and EndPlay() is a good start, or maybe you only want to create and destroy the output at very specific times.
DONT FORGET: In order to hear Wwise SFX objects play via this output, you need to set the listeners on those objects to the AkComponent member variable that is part of our new output class (rememeber, AkComponent is the Wwise Component that we associated with this new output device). The easiest way to set listeners on a Wwise Gameobject is to get a pointer to the Emitter AkComponent of that game object and call AkComponent->SetListeners(), passing in an array of listeners that should listen to this Emitter component.
